Wednesday, September 2, 2009
How to put 'Email me" form on your blog
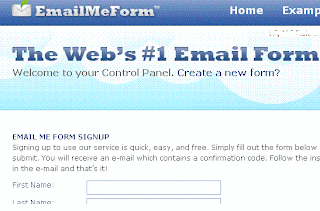
In this post, I will describe, how you can add a "email me" section in your blog. Wouldn't it be nice, if you allow your reader to reach you by direct email instead of writing a private message on the comments? Yes you can do that very easily. Here
is how you will do it:
Step 1. Go to http://www.emailmeform.com and sign up for a free account.
Step 2. Create a form by following there step by step guide
Step 3. Click "get the code" link and copy the code.
Step 4. Paste the code in a new Post and name it "Email me", provide the link to this post any where you want your reader to reach you.
I hope this tutorial will help you to add "Email me" functionality to your blog.
Thanks,
Sumon
Email me
Please use the following form to reach me with any question and concern about this site. Your opinions are highly appreciated and will encourage me to improve the blog.
Wednesday, August 26, 2009
How to Make Money through your website by Adsense
I will show you step by step, how you can make money using your website by google adsense. For more information please visit: http://adsense.google.com.
You will need to follow following steps,
1. Get a website, with administrative privileges. (you may also use your blogspot site, as they allow you to add your own javascripts widgets, to get one go to http://blogspot.com, However, if you want to make more money in shorter time, its better to pay for a site. To get such a site at the lowest possible fee(as low as 30 dollar per year which includes domain registration and hosting), you may contact +8801912955006(Linkinworld.com)) or you can request through this page:
2.Go to http://adsense.google.com and sign up for an adsense account using your existing google email account.
3.Go to your adsense page, and click on "manage ads", select the preferred size and collect the code.
4.Go to your website, and embed the code google gave you with your existing code. Those of you, who use blogspot site, can use "lay out" option and "ad a gadget" then select "your own javascript/html" gadget. Paste the code in the box and click "save". You are done.
5.Start submitting some nice posts, that people might be attracted at. If they click on the google ads you will be making money. For additional help you can always contact me.
Thanks,
sumon
Wednesday, August 19, 2009
Download Aero Studio to create Multiboot DVD/CD English Version 2
To see this tutorial in বাংলা click here.
In the last part we have collected Files. If you have done everything right, your multiboot Folder should have the following contents:
Now Lets start the Aero Studio and click on Format then "Settings"
Chose a picture for the background.
Put required Buttons by clicking on Control-->Button
It may look similar to this:
I configured my button as following:
Now click on the "menu generator" icon as bellow:
Fill the forms like bellow:
Click on "Go" after it done something, click "Cancel" to exit the dialog box.
Now click on the "Deploy menu" Icon as bellow:
Now let us feel up the options like the window below:
click "Next" and then Pick the source (c:\sumon\multiboot or whatever folder you have used). See the example below.
Now its the time to use the ISO file it just generated to burn to a CD/DVD
You may directly burn to a CD and skip creating an ISO file, but I didn't try that. Instead I created ISO file first and then burnt it on a CD. Hope this tutorial will help you to build your multiboot cd/dvd. Please let me know if you faced any problem by commenting here.
Thanks,
Sumon
Update: A few of my readers reported that, when they tried to make xp sp2 CD following this tutorial, it didn't work. Therefore I will try to investigate it, and let you know as soon as possible.
How to create Multiboot CD/DVD part 2
আগের পর্বে আমরা ফাইল গুলো সংগ্রহ করেছি, এবারে সেগুলো কে কাজে লাগিয়ে এরো স্টুডিও দিয়ে সিংগেল সিডি বা ডিভিডি তৈরীর পালা
সব কিছু ঠিক থাকলে, নীচের ছবির মত হবে আপনার বুটেবল ইমেজ ফোল্ডারের কন্টেন্টঃ
How to create Multiboot CD/DVD part 1
To view the following tutorial in English, please click here.
প্রিয় পাঠক বন্ধুরা, আমরা অনেকেই ভাবি যে একটি ডিভিডি বা সিডির মধ্যে অধিক সফটওয়্যার ভরে ফেলে সিডির সংখ্যা কমিয়ে ফেলার কথা। কিন্তু যখন সেটা বুটেবল সিডি হয় তখন একাধিক সিডি একত্রিকরন প্রক্রিয়া টি জটিল হয়ে দাঁড়ায়। আজ আমি সেটাই সহজ ভাবে উপস্থাপন করব। যদিও আজকের এক্সপেরিমেন্ট এ আমি সাধারন সিডি ব্যবহার করেছি, তবে আপনারা ইচ্ছা করলে ডিভিডি ও ব্যবহার করে আরও বেশী বুটেবল সিডি একত্রিত করতে পারবেন। আজকের টিউটরিয়ালে আমাদের যা যা লাগবে তা হলঃ
Tuesday, July 21, 2009
Download IZArc to open almost any compressed file
Download the software from here , In case the link is broken, search google for IZArc. If you need additional help to operate the software let me know by comments.
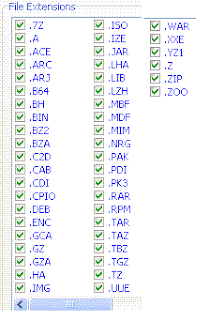
Using this software you can open almost any kind of zip/binary image files including .bin and .iso files. the supported files are : (see the image)
Friday, July 17, 2009
Download Aero Studio to create Multiboot DVD/CD English Version 1
To download the Aero Studio click here.
টিউটোরিয়াল টি বাংলায় দেখতে চাইলে এখানে ক্লিক করুন।
Many of you have couple of windows version in different CD and always wish to reduce the number of disks. Well a free software named Aero Studio could solve your problem. To download the software please visit here. Here are a few screen shots with instruction step by step.
Things that you need:
1. Aero Studio 2007
2. ISO editor (ie. PowerISO)
3. Bootable CDs that you want to combined (In this case, I used Macrium reflect rescue CD and windows XP 3)
Before going further, just wanted to inform you that you may acomplish this very same task by following way, (you may even use bbie to extract boot image, however, here I posted the way I made it) different than that of mine.
Now Let us start the job.
First of all, you will need the required files from both CDs. I have started with XP-sp3 CD, pop the CD in to your ROM drive and hit the copy button of your PowerISO. Chose ".iso" option. Put the ".iso" file into some folder, for example: c:\sumon\multiboot\XP3.iso, do the same thing for Rescue CD and create c:\sumon\multiboot\Rescue.iso
Now pick the ISO file you have just created and start extracting in full to the same directory: c:\sumon\multiboot\
(do the same for other CDs)
Now using the "Delete" button delete all folders inside the iso file(Just the folder not the files in the home directory as this are needed for iso file to work along with the built in bootable info). After removing the folders, click save.
Again do the same thing for all ISO
For example, your XP3.iso will have only the following contentes after delete.
Now 50% of the task is done, Lets move on to the 2nd part.
Tuesday, July 14, 2009
How to convert musics on tape to mp3 files
I know, this is now a quite old trick to perform, since most of us already have converted our old good songs on the tapes to CD or mp3. However, many of my friends still wonder how to do this very easily. I have written this article to just help them. The following items will be needed.
1. PC that has a line in port (Most of the sound cards that are made for a desktop PC, has this port. However, I saw many laptops are not equipped with line in port. If you have no choice but use one of the laptops without the port, you can try on mic in port(You have to fine tune and monitor precisely before initiating the recording process, this job is going to be very tedious to get optimised audio signal)
2. Free Software for Recording and encoding. (1.92 MB in size, if the link dose not work, search google for "CDex").
3. Free Software for slicing audio depending on silence. (Not Necessary, unless you want to convert the whole tape at once and later on split the tracks by detecting silence in between). The size of this software is 216 KB only, if the link dose not work, search google for "Slice Audio Splitter".
4. A Tape player that has a audio output (headphone jack, even an Walkman will be OK).
5. A cable that can connect one side to line in put of the PC and other side on headphone jack of Tape player. (Many 99 cents store have this type of cable in their stock)
You can use any software of your choice, I have given two names above which are free and will fulfill our desire easily.
In high level description, here is what we need to do. First we have to put our favorite Tape in the player, connect the player with PC using the jack I described above. Now we need to record the whole tape using the first software(CD-ex) using record from line in feature. If you only want the track you like most, you can monitor the recording and stop it whenever you think you are done. However, if you want to record the entire tape, you can let it run and check back after an hour or so and stop it after the whole tape is recorded. Then you can split the tracks using the free software (2nd one, slice audio splitter) , which will detect the silence between tracks and splits it. If any one needs detail instruction please leave a comments and I will do it whenever I will have time.
Thanks for reading.
Monday, July 13, 2009
Monday, July 6, 2009
Download Auto Run Virus remover
Thursday, July 2, 2009
Download Adsense Tracking Software
Wednesday, July 1, 2009
how to capture screen cast in an easiest way
Are you wondering how you can create a screen cast to demonstrate an application you have been using and want to share with your friends? well it's not that heard at all, if you have CamStudio 2.5 beta . It is an absolutely free software with all the functionality you need. You may download it from this link or by visiting http://download.cnet.com/CamStudio/3000-13633_4-10067101.html?tag=mncol.
The Pros: You can pause and record , in capture fox (add ons of firefox) you can't do that. The Installation is easy, just download the 1.2 megabyte file and unzip it, you can also keep it in your jump drive (usb pen drives,sd cards etc). You can even transfer it to flash video format. You can enable auto pan feature which will track your mouse pointer and automatically capture that portion.
Cons: In order to improve the performance you need to have a good settings for both video and audio option. Please choose the settings options care fully.
Here is a sample video that I created with Cam studio (this one without voice, but you can create with voice as well) You may reduce file size by reducing region size and changing the video outpu format to flash(swf). If you have any problem operating this software you may write a comment here, I will try my best to give you a solution.
Labels:
How To,
screen cast creator,
screen shot with voice
Thursday, June 25, 2009
How to stop and start jetty server from command prompt
Hello My dear fellow Java Developer friends, Today I want to share with you one of the problem that I faced, and how I solved it. I was assigned to look for a better way to stop a Jetty server. We were stopping jetty by hitting ctrl + C or killing the process from the task manager. I have been searching the web for the solution : How to stop it from command prompt with no luck. Finally with one of our fellow blogger's post (read it here ), where he explained how Jetty can be started and stopped through an ant script, I was able to find a way to stop it using command prompt.
In order to start Jetty (which we all know) people usually use the following command:
java -jar start.jar (assuming you are dealing with Jetty7 eclipse version) However, if you want to be able to stop the jetty server from command prompt, you have to pass two extra jvm properties while starting, such as:
java -DSTOP.PORT=8079 -DSTOP.KEY=secret -jar start.jar
In order to stop Jetty :
java -DSTOP.PORT=8079 -DSTOP.KEY=secret -jar start.jar - –stop (Given the fact that you have used same jvm argument while starting that jetty server)
I hope those of you who are searching the way to stop jetty from command prompt, this post will save you some time.
Wednesday, June 24, 2009
How to use your tv as Monitor
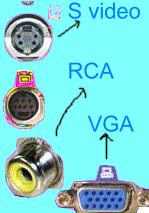
While many of us already know that we can use our television as monitor of the PC, many of us may not aware of this facility. I will now explain how you can take the advantage of this feature. Most of the modern laptop computers are equipped with a TV out option. If you wondering about the look of this output jack it could be one of the following described in the picture bellow:
Many OLD Tvs are equipped with RCA and S Video input while newer TVs are equipped with VGA and HDMI or DVI input. Here we will cover about S-Video, RCA and VGA inputs. Before starting your laptop/pc,if you connect your tv output port with one of your tv inputs that has one of these type of jacks and then start your computer, there is a possiblity you will see your output on tv automaticlaly without configuring your display settings. However, most of the time, it will require you to configure the display settings on your laptop before being able to watch the output on tv.
This is what you need to do (Screen shots are taken from pc with windows xp)
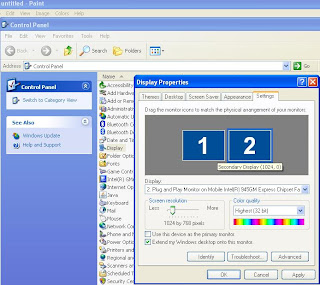
go to start--->controlpanel and then double click on display window (if your control panel is not in classic mode, switch it by clicking the link on the top left corner)
you will see something like following window:
Click on setting tabs, and click on #2 Monitor and checked the option that says "Extended my Windows...." to just enable it as extended display, if you also want to make it primary select the "Use the device as the primary monitor" as well. Then you will see all of the components of the desktop (icons, start button, system clock , etc ) components on television. If you just select the extended desktop option, you will be albe to view any window drag to the #2 monitor side. If you want to switch the side of the external monitor (right or left) on the setting tab select #2 Monitor icon and drag it to the left side of the (or which ever side you like) #1 Monitor. And it will change the side of the external monitor.
By the way, except the VGA output jack, all other means of output will give you relatively blurry output. It is good for watching video but to watch the webpage with tiny text, VGA output is the best choice.
I hope this instructions will help you to view your pc output on your television. If you face any problem feel free to drop a comments here.
Thank you for reading.
Monday, June 22, 2009
Current Redbox Free Rental Code
Those of you are fan of Redbox movies, I will try to post updated Code that allows you to rent a movie for one night at no cost.
For more information, you may check this site.
| |||||||
| |||||||
| |||||||
| |||||||
| |||||||
| |||||||
| |||||||
|
For more information, you may check this site.
Saturday, June 20, 2009
Future Cricket Match Schedule
This schedule information was collected from http://www.cricketcalendar.com . Please visit the site for updated information.
How to watch this matches online click here.
For Result you may visit here.
Australia:
Bangladesh:
England:
India :
New Zealand:
Pakistan:
Srilanka:
West Indies:
How to watch this matches online click here.
For Result you may visit here.
Australia:
Bangladesh:
England:
India :
New Zealand:
Pakistan:
Srilanka:
West Indies:
Subscribe to:
Posts (Atom)