Showing posts with label How To. Show all posts

Friday, June 14, 2013

DIY Refrigerator repair

My long time loyal refrigerator suddenly refused to cool anything down to below 32 degree Fahrenheit. It was beginning of June 2013 and temperature started to raise. We were thinking of getting a new one since this one was over 15 years old. However it turns out that buying and deliver it to the right time when some one be at home is going to cost us more than a week and we still have lots of food which needed to be kept frozen, therefore immediately fixing it sounds better solution than buying one.  

I thought to give it a try. First I did some online research on how the refrigerators function and their maintenance. I came to know it is common for refrigerators that has a defrost mechanism to not to cool anymore if the excessive ice is build up on it's coil that the defroster failed to defrost. Due to those ice my upper portion of the refrigerator was able to cool down to 32 degree but the buttom portion was not able to cool down that much, the temperature was over 65 degree (I measured using my temperature gun that uses laser technology). Because the cold air was not blown, the refrigerator never was out of the defrost cycle as the ices were built up on the coil and obviously the defroster failed to melt it. An youtube video gave a very good detail of what I needed to know. 
This was a Norge Refrigerator on the top right.
The interior look like the picture below.
I start dissembling the fridge. Doors were easy to take off, however one of the screws that kept the middle segment cover refuse to loose no matter how I tried. I sprayed some WD-40 and had to wait for a while to loose this one and finally I was able to get to the middle section where the coil resides. Here are the pictures and the description of the steps I took: 
Step 1: I took the doors off
Step 2: I had to loose extra two screws that were covering the temperature control unit. that looks like the picture on right.
Step3. After get the cover off, I pull the controller and It came off like a drawer. you can see how it will look like on the picture. I saw a thick layer of ice covering the cooling coil.
Step 4: I started to crash the ice gently using a kitchen knife, but that was an idiotic act, as I realized I could easily melt them using hair dryer
    Step 5: I started using hair dryer, then I thought of using warm water, and it turned out to work faster than the hair dryer.

 Step 6: I was getting impatient as the melting process was taking too long I used hot water, after melting significant amount of ice I was able to remove the foam cover on the top of cooling coil


Step 7: Still lots of ice to remove, repeated the hair dryer, crushing and throwing hot water couple more time finally it was clean enough to see the cooling coil and the defrost coil seating inside the cooling coil assembly (Picture on right)
Step 8: I found that the one end of the defrost coil is severely corroded, in order to make sure the defrost coil is intact I used my digital multimeter and it shows the continuity between two ends. I re connect the corroded end with electrical tape and put the defrosting coil back where it was.   

Step 9: Start assemble all the parts that I dissembled. 
Step 10: Start the refrigerator and after a few minute I hear the cooling chember started blowing the cold air again, happy end of my measurable story.

Tips: To avoid this situation, you should always make sure your refrigerator is not overloaded and always have enough space to circulate the air. Also don't forget to clean the rear of your refrigerator and vacuum the air filtration compartment.
Thanks for reading.


Thursday, June 7, 2012

Making a DIY fitted RealD 3d glass (Passive) with a regular frame.

I have been enjoying my LG 47LW5600 3d TV for a year by now. It came with four pair of nice 3d glasses. I also had a few pairs of reald 3d glasses left from the reald 3d movies that I watched in the theater. These glasses works fine with my 3d tv so I used them whenever we had extra guests visiting us. Those reald 3d glasses were very uncomfortable to me as they were too big to wear. This post is about how I customized those glasses for additional comfort.

Here is Step by Step Procedure with the picture to help anyone who wants a pair of 3d glass that nicely fits.

Step 1: Gather the tools and items you need:
1. Scissors
2. small flat end screw driver.
3. A eye glasses frame that fits nicely on you (You could buy this type of frame with glasses from 99 cent store which I did)
4. A pair of realD 3d glasses.


Step 2. remove the two temples (Look at the hinge and you will figure out how to pull them off)


Step 3. Using screw driver pry off the upper parts of the main frame.


Step 4. Take out the plastic filtered lenses.


Step 5. Take out the glass from the selected frame (Which you want to turn into a 3d glasses) and keep it on top of the plastic lens and mark the circumference with a pin.


Step 6. Cut the glass following the outline.


Step 7. Snap the plastic to the frame where the glass used to be.

Wednesday, August 19, 2009

Download Aero Studio to create Multiboot DVD/CD English Version 2

To see this tutorial in বাংলা click here.
In the last part we have collected Files. If you have done everything right, your multiboot Folder should have the following contents:

Now Lets start the Aero Studio and click on Format then "Settings"


Chose a picture for the background.


Put required Buttons by clicking on Control-->Button


It may look similar to this:

I configured my button as following:


Now click on the "menu generator" icon as bellow:

Fill the forms like bellow:
multiboot13
Click on "Go" after it done something, click "Cancel" to exit the dialog box.

Now click on the "Deploy menu" Icon as bellow:
multiboot13-2
Now let us feel up the options like the window below:
multiboot14

click "Next" and then Pick the source (c:\sumon\multiboot or whatever folder you have used). See the example below.
multiboot15
Now its the time to use the ISO file it just generated to burn to a CD/DVD
multiboot16
multiboot17
You may directly burn to a CD and skip creating an ISO file, but I didn't try that. Instead I created ISO file first and then burnt it on a CD. Hope this tutorial will help you to build your multiboot cd/dvd. Please let me know if you faced any problem by commenting here.
Thanks,
Sumon

Update: A few of my readers reported that, when they tried to make xp sp2 CD following this tutorial, it didn't work. Therefore I will try to investigate it, and let you know as soon as possible.

How to create Multiboot CD/DVD part 2

আগের পর্বে আমরা ফাইল গুলো সংগ্রহ করেছি, এবারে সেগুলো কে কাজে লাগিয়ে এরো স্টুডিও দিয়ে সিংগেল সিডি বা ডিভিডি তৈরীর পালা
সব কিছু ঠিক থাকলে, নীচের ছবির মত হবে আপনার বুটেবল ইমেজ ফোল্ডারের কন্টেন্টঃ

How to create Multiboot CD/DVD part 1


To view the following tutorial in English, please click here.
প্রিয় পাঠক বন্ধুরা, আমরা অনেকেই ভাবি যে একটি ডিভিডি বা সিডির মধ্যে অধিক সফটওয়্যার ভরে ফেলে সিডির সংখ্যা কমিয়ে ফেলার কথা। কিন্তু যখন সেটা বুটেবল সিডি হয় তখন একাধিক সিডি একত্রিকরন প্রক্রিয়া টি জটিল হয়ে দাঁড়ায়। আজ আমি সেটাই সহজ ভাবে উপস্থাপন করব। যদিও আজকের এক্সপেরিমেন্ট এ আমি সাধারন সিডি ব্যবহার করেছি, তবে আপনারা ইচ্ছা করলে ডিভিডি ও ব্যবহার করে আরও বেশী বুটেবল সিডি একত্রিত করতে পারবেন। আজকের টিউটরিয়ালে আমাদের যা যা লাগবে তা হলঃ

Friday, July 17, 2009

Download Aero Studio to create Multiboot DVD/CD English Version 1

To download the Aero Studio click here.

টিউটোরিয়াল টি বাংলায় দেখতে চাইলে এখানে ক্লিক করুন।

Many of you have couple of windows version in different CD and always wish to reduce the number of disks. Well a free software named Aero Studio could solve your problem. To download the software please visit here. Here are a few screen shots with instruction step by step.
Things that you need:
1. Aero Studio 2007
2. ISO editor (ie. PowerISO)
3. Bootable CDs that you want to combined (In this case, I used Macrium reflect rescue CD and windows XP 3)

Before going further, just wanted to inform you that you may acomplish this very same task by following way, (you may even use bbie to extract boot image, however, here I posted the way I made it) different than that of mine.

Now Let us start the job.
First of all, you will need the required files from both CDs. I have started with XP-sp3 CD, pop the CD in to your ROM drive and hit the copy button of your PowerISO. Chose ".iso" option. Put the ".iso" file into some folder, for example: c:\sumon\multiboot\XP3.iso, do the same thing for Rescue CD and create c:\sumon\multiboot\Rescue.iso

Now pick the ISO file you have just created and start extracting in full to the same directory: c:\sumon\multiboot\
(do the same for other CDs)


Now using the "Delete" button delete all folders inside the iso file(Just the folder not the files in the home directory as this are needed for iso file to work along with the built in bootable info). After removing the folders, click save.
Again do the same thing for all ISO

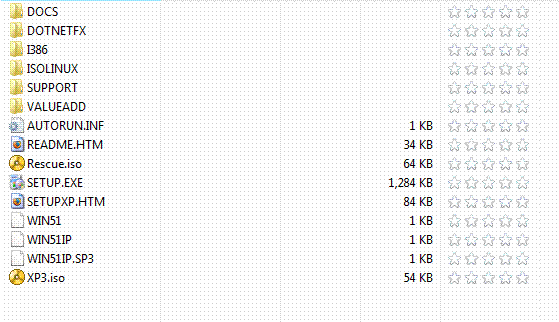
For example, your XP3.iso will have only the following contentes after delete.

Now 50% of the task is done, Lets move on to the 2nd part.

Tuesday, July 14, 2009

How to convert musics on tape to mp3 files

I know, this is now a quite old trick to perform, since most of us already have converted our old good songs on the tapes to CD or mp3. However, many of my friends still wonder how to do this very easily. I have written this article to just help them. The following items will be needed.

1. PC that has a line in port (Most of the sound cards that are made for a desktop PC, has this port. However, I saw many laptops are not equipped with line in port. If you have no choice but use one of the laptops without the port, you can try on mic in port(You have to fine tune and monitor precisely before initiating the recording process, this job is going to be very tedious to get optimised audio signal)

2. Free Software for Recording and encoding. (1.92 MB in size, if the link dose not work, search google for "CDex").

3. Free Software for slicing audio depending on silence. (Not Necessary, unless you want to convert the whole tape at once and later on split the tracks by detecting silence in between). The size of this software is 216 KB only, if the link dose not work, search google for "Slice Audio Splitter".

4. A Tape player that has a audio output (headphone jack, even an Walkman will be OK).

5. A cable that can connect one side to line in put of the PC and other side on headphone jack of Tape player. (Many 99 cents store have this type of cable in their stock)


You can use any software of your choice, I have given two names above which are free and will fulfill our desire easily.

In high level description, here is what we need to do. First we have to put our favorite Tape in the player, connect the player with PC using the jack I described above. Now we need to record the whole tape using the first software(CD-ex) using record from line in feature. If you only want the track you like most, you can monitor the recording and stop it whenever you think you are done. However, if you want to record the entire tape, you can let it run and check back after an hour or so and stop it after the whole tape is recorded. Then you can split the tracks using the free software (2nd one, slice audio splitter) , which will detect the silence between tracks and splits it. If any one needs detail instruction please leave a comments and I will do it whenever I will have time.

Thanks for reading.

Thursday, July 2, 2009

Download Adsense Tracking Software

এই সংক্রান্ত পোস্ট টি বাংলায় দেখতে চাইলে এখানে ক্লিক করুন, শুধু সফটওয়্যার ডাউনলোড করতে চাইলে ক্লিক করুন এখানে

Wednesday, July 1, 2009

how to capture screen cast in an easiest way

Are you wondering how you can create a screen cast to demonstrate an application you have been using and want to share with your friends? well it's not that heard at all, if you have CamStudio 2.5 beta . It is an absolutely free software with all the functionality you need. You may download it from this link or by visiting http://download.cnet.com/CamStudio/3000-13633_4-10067101.html?tag=mncol.

The Pros: You can pause and record , in capture fox (add ons of firefox) you can't do that. The Installation is easy, just download the 1.2 megabyte file and unzip it, you can also keep it in your jump drive (usb pen drives,sd cards etc). You can even transfer it to flash video format. You can enable auto pan feature which will track your mouse pointer and automatically capture that portion.

Cons: In order to improve the performance you need to have a good settings for both video and audio option. Please choose the settings options care fully.

Here is a sample video that I created with Cam studio (this one without voice, but you can create with voice as well) You may reduce file size by reducing region size and changing the video outpu format to flash(swf). If you have any problem operating this software you may write a comment here, I will try my best to give you a solution.

Wednesday, June 24, 2009

How to use your tv as Monitor

While many of us already know that we can use our television as monitor of the PC, many of us may not aware of this facility. I will now explain how you can take the advantage of this feature. Most of the modern laptop computers are equipped with a TV out option. If you wondering about the look of this output jack it could be one of the following described in the picture bellow:

Many OLD Tvs are equipped with RCA and S Video input while newer TVs are equipped with VGA and HDMI or DVI input. Here we will cover about S-Video, RCA and VGA inputs. Before starting your laptop/pc,if you connect your tv output port with one of your tv inputs that has one of these type of jacks and then start your computer, there is a possiblity you will see your output on tv automaticlaly without configuring your display settings. However, most of the time, it will require you to configure the display settings on your laptop before being able to watch the output on tv.

This is what you need to do (Screen shots are taken from pc with windows xp)
go to start--->controlpanel and then double click on display window (if your control panel is not in classic mode, switch it by clicking the link on the top left corner)
you will see something like following window:


Click on setting tabs, and click on #2 Monitor and checked the option that says "Extended my Windows...." to just enable it as extended display, if you also want to make it primary select the "Use the device as the primary monitor" as well. Then you will see all of the components of the desktop (icons, start button, system clock , etc ) components on television. If you just select the extended desktop option, you will be albe to view any window drag to the #2 monitor side. If you want to switch the side of the external monitor (right or left) on the setting tab select #2 Monitor icon and drag it to the left side of the (or which ever side you like) #1 Monitor. And it will change the side of the external monitor.

By the way, except the VGA output jack, all other means of output will give you relatively blurry output. It is good for watching video but to watch the webpage with tiny text, VGA output is the best choice.

I hope this instructions will help you to view your pc output on your television. If you face any problem feel free to drop a comments here.

Thank you for reading.

Saturday, June 20, 2009

How to view unicode Bangla on your Windows PC

Since Unicode fonts are very famous these days, we should all update our PC to be able to take the advantage of Unicode fonts. Many of us are not aware of this Unicode fonts. If your Windows PC are not being updated constantly since service pack 2, your PC may also lack the capability of showing Unicode Bengali fonts. Here is how you can fix the problem.

1. Download the Unicode bangla fonts
a) Download vrinda. (Those of you who see Bengali but very small can delete C:\windows\fonts\vrinda.ttf file and replace it with this vrinda font)
b) Download Shyam Rupali Font.

2. Copy the fonts to your control panels' Fonts folder (or X:\windows\fonts folder, replace the 'X" your system drive letter )

If you have followed the instruction correctly, after refreshing your browser you will see the bellow line in Bengali.

সাবাস! অবশেষে আপনি ইউনিকোড বাংলা ফন্ট দেখতে পেলেন। এখন থেকে যে সব ওয়েবসাইট ইউনিকোড ব্যবহার করে, সেসব ওয়েবসাইট এর লেখা পড়তে আপনার আর কোন সমস্যা হবে না। তবে ইত্তেফাক বা প্রথম আলো পড়তে হলে তাদের ওয়েবসাইট এর নির্দেশ অনুসরন করে তাদের বাবহৃত ফন্ট্‌ ডাউনলোড করে ইন্সটল ক্করে নিন।
ধন্যবাদান্তে ,
সুমন

Now Most of you should be able to follow the high level instruction given above, However a few of you who has very limited knowledge of installing fonts, may get lost in between. If that is the case, I have screen shots that clearly shows how the process look like on a XP machine. Here we go:

Step 1:
Click on the "vrinda" link that I provided,it will take you to a different website where the font is available. Right click on the download link of that page (asuming you have Internet Explorer as browser) pick "save target as" (For firefox browser select "save link as") :


Step 2:
On the following window(save target as window asking where you want to save the file to) click on "My computer" icon from left pane, and type c:\windows\fonts\vrinda.ttf If your windows installation is in different drive (ie, E:, D:, etc) use that letter instead of c:. Click on "Save". If it saves successfully then you are done just needs to refresh the browser and you are done (you may come back to this page, when your browser starts again and check if you can read the Bangla sentences written on this page. Otherwise, follow next.


Extra Steps:

Extra 1:

Some of you who may already have an older version (Those who see bangla font but too small to read) and will see some pop up dialog like this:


Extra 2:

Click on" No". you now need to remove the old version. To do that go to your windows xp control panel by clicking on 'Start---->control panel"


many of your control panel may be in category mode. For convenience lets switch it to "classic" view by clicking on the circled link.

The window look will be changed like bellow:


Extra 3:

Now lets double click on Fonts folder. Since "vrinda" starts with 'v' the file will be located all the way bellow (assuming the file is arranged by name). When we find the "vrinda" font we will right click on it and select "delete". If "are you sure" window pops up click "yes" and go to step:2, or else follow next step.


Extra 4:

If the browser is open or the font is being used anywhere else it will show you an error message like bellow: Click "Ok" .
You will need to shut down all your browsers and word document files which ever is opened. Then follow Extra 3: and onward again.


I hope this tutorial will help you to solve the Unicode Bangla Font viewing problem. if you still have problem to view Bangla Unicode fonts, please feel free to post a comment here.

Thanks for reading.

Easiest Way to Write Bengali on your PC

I am originally from Bangladesh. I always loved to write in Bengali on my PC whenever possible. I really hated writing Bengali by using English character. However, I never trained my self on traditional Bengali Typing media (ie, Munir, Bijoy, Unijoy keyboard). As a matter of fact I hate them and I found them pretty difficult to follow as I am very used to with English keyboard. Earlier days, when unicode wasn't that famous I developped my own type face named "Sumon Bangla Font" which followed different keymaps (phonetical , for example, a for akar, A for oa, b for boa, almost close to proshikha but not exactly). However the true type fonts (non-Unicode) are no longer encouraged to use as Unicode became much more famous these days.

Now we all are familiar with unicode fonts. I think it is the best means of writing. Each language has it's own assigned code for it's all alphabets. I had used a lot of software that dose the job of writing bangla on the PC. Among all of them, I found AVRO KEYBOARD ( অভ্র কী-বোর্ড) is the best, specially the portable version.

Any one can download the portable Avro from this link, and just extract it to any portable media (SD cards, usb storage drive, etc) ant it will be ready to use. Avro may prompt you to install complex indic scripts (if it is not previously installed on your system), otherwise you don't have to install anything else. You can start it by double clicking on "Avro Keyboard.exe" and you are ready. Where ever you want to write in bangla, just point your mouse there and hit "F-12" keys on your keyboard and you will be writing bangla in a second. To switch back to english you again press "F-12" and you will be writing in english. It is good for all version of Windows. (Even on Vista, I was able to use it with intermittent program crash[no big deal]).

[ From here onward I will use some bengali letters, in case you don't see them for lack of unicode support on your pc , please view my post on "How to view unicode bangla on your PC" ]

The best part of Avro is it's very flexibla and gives user a lot of choices. One can even chose between traditional bangla keyboard that are previously existed (ie unijoy, bornona, National, etc). I always like the phonetic keyboard, as it automatically translate what ever I write in english letter to bengali. I can easily customise my own words. For example, if I want to write ভালো , without customize the auto correct dictionary I need to type "valO". But using the auto correct tool i made avro automatically write "ভালো" when I type "valo". I also had used avro auto correct tool to show many english word (that we usually use like bengali) to showed up correctly. For example if I type "driver", My avro (as I customized it) will output "ড্রাইভার". Customizing Avro auto correct option is very easy. All you need to do is right clicked on this icon:

A menu will appear like the following window:


From this menu click on Customize ovro keyboard. Then on the next window chose "Avro Phonetic..." After that click on "Auto correct entries". Then A window like this (Look at the screen shot bellow) will appear:

On this Auto correct window on the write hand side type what you want to type, for example "ktritoggota ", now on the right side type what you actually want avro to output on the screen " কৃতজ্ঞতা" (For which you actually need to type: " krritoggota" ) you may see the keyboard lay out to find out how the keys are mapped. After you are done you click on "save". From Next onward, when you type "kritoggota" ovro will show কৃতজ্ঞতা instead of ক্রিতজ্ঞতা .


Avro saves this correction in a file named "autodict.dct" in Avro Keyboard program folder. You may replaced this file with some one else's customized file. For example you can replace the autodict.dct file with my "autodict.dct" file which has already over 9000 customized word from here . After you replace the file you need to restart Avro software.

As of today, I personally think Avro is the best media to write Bengali on your Windows PC. However, Avro yet not available for linux, you may check on Avro's home page for more updated information.

RelatedPost

Blog Widget by LinkWithin